Working on a small collection

What I’ve been working on:

Following Gertie’s tutorial, I’ve been making these felt roses over the past couple of weeks (in between working on the project below, anytime I feel I need to create something tangible). I want to make my own fascinator, like the ones she’s selling, when I have enough.


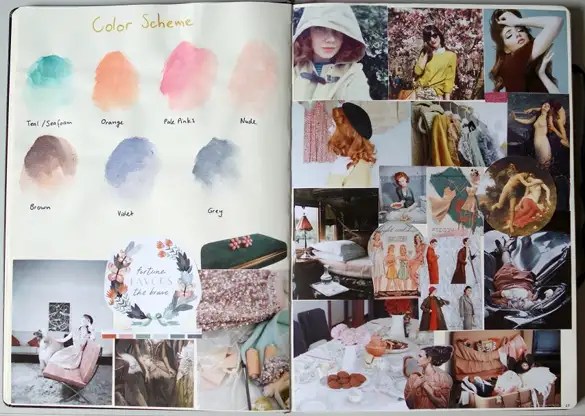
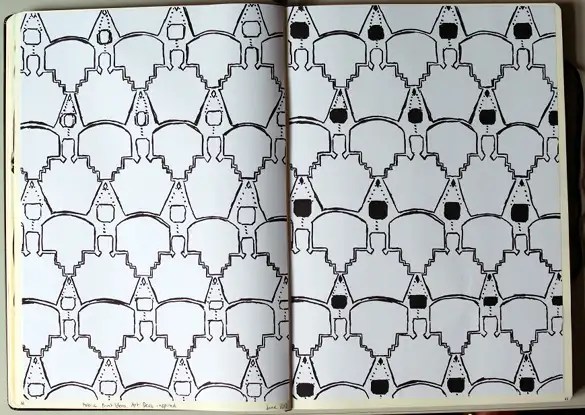
These are just a couple pages from my sketchbook. I feel a bit weird sharing all these sketches and inspiration pages, since I haven’t actually made any clothes yet, but I need to get back into blogging, and I guess sharing progress is motivating. Helps me keep track of how much I’ve done so far.

I spent a few weeks sorting through all of my inspiration folders on my computer (so many! ugh). I have about 1’900 images (some are duplicates though, say I have an image of a girl wearing a blouse and pants, I’ll put a copy of the image in each folder “blouses” and “pants”, and if there’s a special design feature, another copy in say “knots & bows”).

I’ve been trying to figure out what I want the theme of this small collection to be. Sorting through inspiration images is definitely good though, I feel like it’s a slightly frustrating (I feel like I’m not actually doing anything) but important step, and I don’t want to rush. I think the central, inspiring themes for this collection are: 1950s fashion/silhouette, insects/insect anatomy and art deco. I know at first they may seem relatively unconnected, but that’s what I’m working on figuring out :)

I got and altered some vintage dresses in may, but I don’t have photoshop to edit .RAW files at the moment, so it might be a while before I can share those unfortunately… but I made something else earlier this month (not a garment though) that I want to share later this week!

HTPS – WIP 2

Haha, shortening the “Houndstooth Poodle Sheath” to HTPS makes it sound like some new and hip disorder!

I worked on the dress on the train to Zürich today, taking out the sleeve I had already put in (didn’t baste and ease the entire section, read the markings wrong :)), hand basting and easing the sleeve, and then basting the sleeves to the bodice. I like the control hand basting gives! Now all I have left to do is go over it with my machine and serging the seam allowances.
I’m so glad I took it on the train to work on it by hand, after messing up the sleeve slightly on monday evening I got a little demotivated, hand-sewing was just what I needed!

Ah, and now the zipper. I’ve been doing lapped zippers lately (well, two so far), one according to Gerties instructions in her “Bombshell Dress” e-course, and for the other one I followed the Butterick instructions (this was for the Lucille Dress, Butterick 2907). When I followed the Butterick instructions, I wasn’t even sure what kind of zipper I would end up with! It involves basting the back of the dress closed (where the zipper will be), then attaching the zipper, and then taking out the basting.
Is this the “normal” way to insert a lapped zipper? Since I don’t own any sewing books I’ve had to learn from the internet, so I don’t know, am I the only one who didn’t know this technique? Or are there others like me out there? :) I found the instructions a little weird to follow, should I maybe try a tutorial? I’ve never made a tutorial (mostly because I don’t feel I have anything to teach, haha!), but I could make one for this. What do you think? Does everyone but me already know this technique? What I like about it, is that you can make sure the two sides will match up perfectly, since you baste it closed first.

Btw, thank you for the suggestions for attaching/interfacing the collar and cuffs! I’m going to test how visible/uncomfortable the snaps are, and I’m going to use fusible-interfaced muslin as an underlining for collar and cuffs. We’ll see how it goes!

Houndstooth Poodle Sheath – WIP

Worked on it this weekend! I might be able to finish it tonight. I shortened the bodice by 2 cm and added a 3 cm waistband. I also made the scoop neckline slightly lower, and lowered the back neckline. All that’s left to do is put in the sleeves, the zipper and hem the skirt! And after that, the collar and cuffs of course.
I decided I’m not going to line it after all, the fabric isn’t itchy, and it comes on and off pretty easily. I did interface the waistband and neckline facing though.

I still haven’t taken proper pictures of the two dresses I made in October because it’s been so dark outside lately, but I’ll force myself to do it this week anyway (because by then I’ll hopefully have 3 dresses to show!).

Lucille Muslin take 2 (+ low-quality photos of the dress)


I took in the sleeves by 1″ and the sideseams of the dress by 2″ from underarm to waist, and by 1″ from waist to hem, that seemed to fix the problem! The muslin still has some weird looking folds, but I assumed that it would be fine when done in wool crepe, and I was right! (phew…)

I finished the dress saturday evening, just in time for partying! It’s definitely not a “serious dancing” dress, (even though it’s really comfortable!) it does get very warm, which is good when you need to go outside for some fresh air. And I wasn’t even wearing tights!

I’ll post some more “technical details” when I take proper pictures, for now, here’s me trying to be Lucille Bluth:

Ice cream sandwich!! and me attempting a Lucille Bluth facial expression.

(the last two pictures show the color quite well, it’s an almoust blue purple)

Lucille Dress – Muslin

I made the muslin today, and I was fast too! I didn’t do the collar (I don’t think I’ve ever made a complete muslin, I usually only do one sleeve, or even just one half of the piece), since I wasn’t using a fabric that drapes as nicely as the wool crepe I’m using (I just can’t afford anything else than muslin, even that it kind of expensive in switzerland) I don’t think the collar would’ve looked good anyway.


It’s definitely not the most flattering thing I’ve ever made, but I have quite a few snug sheath dresses already, plus it’s the Lucille Bluth Dress!! Not the Lindsay Fünke Dress.

I do think it looks better in real life than in pictures, but there’s still something about the sleeves that I don’t quite like. I think it’s the folds that radiate from the armpit (never thought I’d use “radiate” and “armpit” in the same sentence…), as visible in the first picture. But I don’t know how those folds will look when I make it with wool crepe. And I want this to be a comfy dress, a dress that I’d wear on a cold day, when I’d rather wear my I <3 NY sweatshirt than a sheath dress but still want to look put together (because the fabric is so gorgeous!), so I don’t want the sleeves to be too tight.

The sleeve has a dart in it, so I’m thinking there might be a way to adjust the pattern, so that the weird folds are gone? Or maybe I need to change the side/sleeve-seam?

Or maybe there’s not really a problem, cause the wool crepe will be heavy enough to not bunch up like the muslin does?

Well, I only just started pre-treating my fabric (and it will take a while, working in small sections) so I have some time to think about it…

Fur Shrug and a Package

I got started on the outer part of my shrug today.

Tomorrow I will buy the red velvet lining fabric + ribbon so I can finish it :)

And my package arrived today! So happy to finally have my new fabric at home :) Here’s a shot of all of them (except for a doublesided grey/black knit):

I’ll do a post on my plans for them soon, with better pictures (the color is a little off for some of the fabrics in this picture).

Fur Shrug

Good news for me, my package isn’t lost! I haven’t felt so relieved in a long time, it was a “feel sick from the moment you wake up and remember what happened” day, but my aunt went to the post office and they informed her the package got to New Jersey on tuesday morning (why it would take a package 16 days to get from Westchester county NY to New Jersey, I don’t know)! Now I can happily dream about my fabric again, because the dreams can come true!

Ok, enough of all this warm fuzzy-ness and back to important things: sewing.

Here in Switzerland it’s starting to get cold in the evenings, and I just don’t have the perfect little (dressy) jacket to take along when I go out. So I’m finally making the fake-fur shrug (with leftover fabric from this) I’ve been wanting to make since feb 17th of this year (I dated my sketch haha, how cute is that…):


I’ll make the ribbon bigger when I sew it, probably a velvety one. If I have enough fabric I’ll line it with the fur, if I don’t I might use a red velvet or something.

Actually, now that I think about it I almost like the idea of contrasting red velvet better. Hm. then I might have enough of the fur fabric lef over to make a stole.

Off to draft the pattern and make a muslin!

I got a serger!

I ended up ordering the Brother 1034D from amazon, and shipped it to Switzerland (the $ is so cheap right now and it was still cheaper than getting a cheap one here..), and now I have a serger! Lucky for me I can start serging right away, we had the right transformer in the garage :) ALthough I still need to get thread…

Haha, at first I was so scared to press the pedal all the way down, because the light started to ficker when I applied just a bit of pressure. So I called my dad (scared the machine would break if I pressed the pedal down further), and after he got tired of me putting my foot on the pedal and then stopping and saying “no, I can’t do it!” he just pressed it down. And everything is fine. haha…

I have to admit, I don’t know what those cone-y things are (next to the machine in the picture), there are four of them so I suppose it has something to do with the spools? This is exciting! I have a machine I need to learn how to work!

I finally made the pattern for the skirt for the mint dress, and marked the pieces on the fabric. It was hard figuring out how to fit all of the pieces (with the annoying shape of the back pieces, the hem facing, and me wanting to sew the bodice pieces doubled up because of the sheerness):


(played around with the contrast so you can see the pieces marked, that’s not really what the color looks like!)

I’m off to cut!

Scallops and Fabric

Corrected the back bodice pattern (I decided I’m going to leave the front as I drafted, without the under bust dart, the straps keep the fabric from folding!) and started on the math for the 3/4 circle skirt pattern today.

I don’t have enough fabric for a full circle, so I’ll make a 3/4 circle skirt. In order to fit all the pattern pieces on the fabric, I’ll have to sew the straps from 2 pieces (the back piece with the ties and the straps is this ridiculous shape that wastes so much fabric! I hope it’ll be worth it :))

Also made “test-scallops” from newspaper. I think I’m going to make the scallops about 12cm wide (the top one in the picture):

On an unrelated note, I got this large pillowcase at the thrift store a few weeks ago, and I’m not sure what I want to do with it yet (the spool is there for size comparison):

I like the stripes and the color! Maybe a romper (chevron effect)? The colors are very summery and “fun”. Or a dress with a gathered skirt? I’ll have to see if I have enough fabric.

Mint Muslin

Well, it isn’t exactly muslin, just scrap fabric I had lying around:

I added a “dart” on one side as you can see, and it makes the fit better, but it makes folds in the fabric. I think the only solution would be a seam under the bust like this:

On the other hand I don’t want it to be tooo bustier-looking (don’t get me wrong, I love bustiers, but it’s just not what I’m going for…). And I don’t want to have too many seams on the bodice. I need to think about how I’m going to fix it. Maybe I don’t need that dart and the fabric won’t bunch up under the bust once I have the straps?

the straps need to be fixed first, which is why I had them tied around my neck: